fbpx
Open post
Learn how hanging punctuation enhances the reader experience!

Create Visual Balance with Optical Margin Alignment

When you want your page to have visually clean, crisp lines, using hanging punctuation can help! Hanging punctuation was first used in the Gutenberg bible where hyphens and other text features were slightly bumped into the right and left margins to create visual uniformity on the page. It was a very tedious job in those days and usually there was one person dedicated solely to that task. In modern times, advanced typesetting software makes this a simple job. It includes more than just hyphens and punctuation, and is called optical margin alignment.
So...what is it?
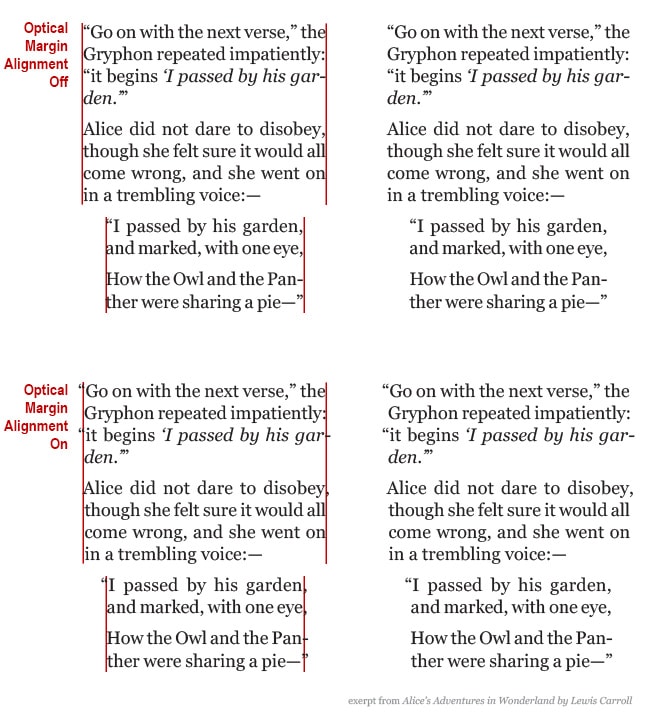
This optical margin is the "invisible line" that your eyes see when looking at the right and left edges of a block of text. Take a look at the text samples below:
optical-margin-alignment
When characters like quotation marks, periods, commas, hyphens and dashes, and others are not hung into the margins, it creates a visual indent, or negative space, in the block of text as a whole that can sometimes feel distracting to the reader. Using optical margin alignment helps create the appearance of a flush right and left edge by removing the negative space. This more visually balanced text allows the reader a neat, clean, uninterrupted reading experience.
It should also be noted that, while this technique is widely used - especially with justified text, it's not a rule set in stone that it should always be used. It can be used throughout your book, or just in certain places, like excerpts, quotes or lists that, by design, are separated from the main flow of text. Ultimately the decision to use optical margins is a matter of preference that, as a self-publishing author, you can decide if it seems right for your book. Some people prefer the look of their text without the optical margin alignment and that's okay. The overall goal is to create a great reading experience and sometimes we get there in in different ways.

Help for Independent Presses

Book Design & Production

Have you written a nonfiction or fiction manuscript? After it has been professionally edited, I can design the interior pages and cover, plus guide you through the maze of book publishing and printing. To get started, contact me to discuss your project and my helpful guide for authors.

Open post

What goes on your Title Page?

Did you know that your book can contain two title pages? The first appears as the very first page when you open the cover and is called a half title page. The only thing on this page is the title of your book, usually small and understated. A half title page is not a requirement, and is mostly a leftover tradition from back-in-the-day when it is said to have been used as protective measure during the printing process.
Whether or not you choose to include a half title page is up to you and the needs of your books, but you wouldn't want to leave out the second type, the title page. The title page is an important page that acts as a welcoming committee to those who've opened the book. It is the official start of your book and its design and content is quite simple, containing the:
  • full title of the book
  • subtitle if there is one
  • author name(s)
  • publisher name and location
Depending on the genre of your book other information may also appear here, such as an editor name or edition numbers.
Just because a title page is simple doesn't mean it has to be boring (says the designer!) A common design technique is to echo the cover by adapting artwork and/or font styles used there to appear on this page. If complex artwork is used on the cover, you may have to simplify it so that it doesn't overwhelm the page and that it prints well in black and white (if that's how your book's interior will be printed.)
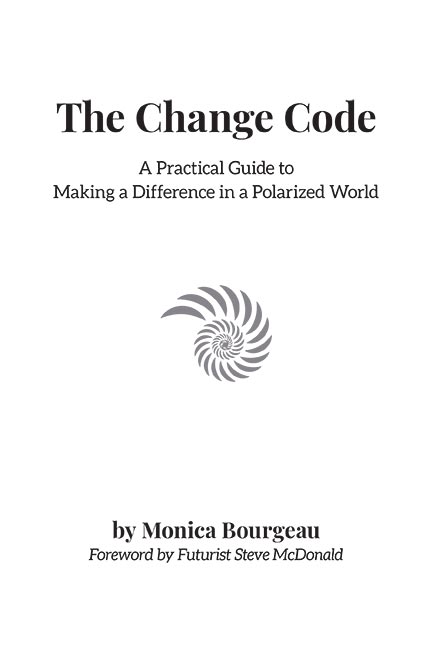
Here are a couple examples of title pages that I've recently designed.

The title page for The Change Code uses the same font from the cover and a nautilus shell used as a decorative element both on the cover and throughout the interior as a section divider.

Seizing Moments of Possibility closely echoes the cover design. It also lists the publishing company name and location under the author name.

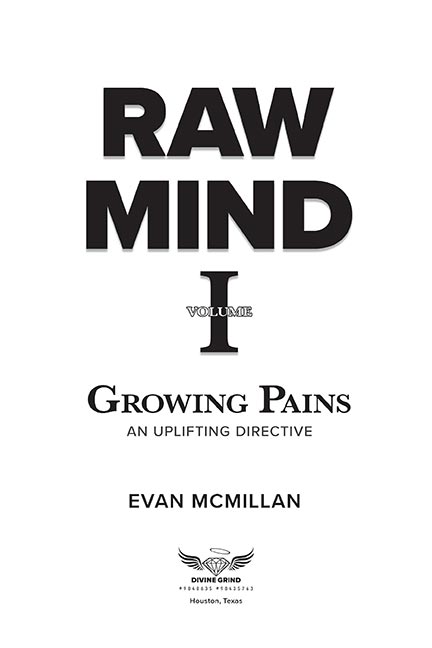
Raw Mind also closely echoes the cover design and shows the publishing company name, logo, and location.

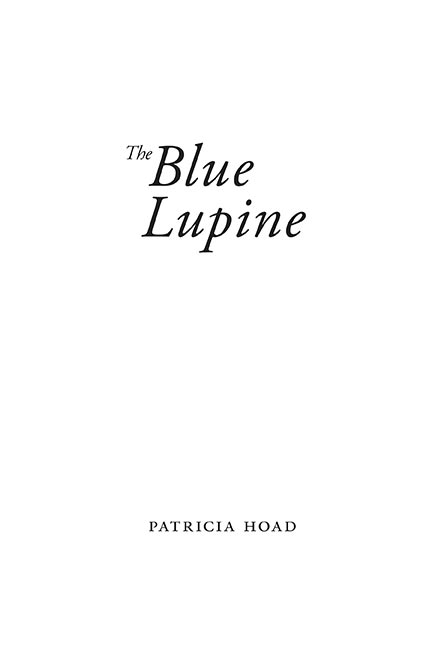
The Blue Lupine, a book of poetry, uses a very simple title page design. The font and arrangement of text echoes the cover.

Help for Independent Presses

Book Design & Production

Have you written a nonfiction or fiction manuscript? After it has been professionally edited, I can design the interior pages and cover, plus guide you through the maze of book publishing and printing. To get started, contact me to discuss your project and my helpful guide for authors.

Open post

What goes in the front matter of your book

Do you wonder what kind of content should go in your front matter? Front matter is all of the pages before your first chapter or part and contains information about your book, provides a way to navigate the book, and introduces it to your reader. These pages are numbered with lowercase roman numerals (i, ii, iii, iv, v, etc.) and, although they shouldn't be printed on the title page through the table of contents, they are included in your total page count. Page 1 usually starts at the first chapter or part.

Tips for organizing your front matter.

The Chicago Manual of Style indicates that the order of the front matter should be:

  • Book half title
  • Series title, other works, frontispiece, or blank
  • Title page
  • Copyright page
  • Dedication
  • Epigraph
  • Table of Contents
  • List of Illustrations
  • List of Tables
  • Foreword
  • Preface
  • Acknowledgments (if not part of preface or in the back matter)
  • Introduction (if not part of text)
  • Abbreviations (if not in the back matter)
  • Chronology (if not in the back matter)

Clearly, not all of these elements will be in every book, but this will give you guidance on how to organize the parts that you do have.

Pro-Tip: To help your book designer organize and set a design for your book, create a content map for them. This can be a simple Word document that lists each component of your book. Any special instructions that you have for each part can be included.

Help for Independent Presses

Book Design & Production

Have you written a nonfiction or fiction manuscript? After it has been professionally edited, I can design the interior pages and cover, plus guide you through the maze of book publishing and printing. To get started, contact me to discuss your project and my helpful guide for authors.
Open post
Tips on how to prepare your manuscript for the book designer.

Preparing Your Manuscript for the Book Designer

So you've finished writing your book and are ready for the layout and design stage. Before you send it off to your formatter there's a bit of "house cleaning" to do first to ensure that they can clearly see and understand the formatting needs of your book. Remember, the designer is not as familiar with your content as you are, so preparing a clean document to send to them saves time (and cost) and helps eliminate guess work or misunderstanding of how an item is intended to look on the page.
So! roll up your sleeves and get ready to clean up your working document.

Tips for preparing your manuscript
for the book designer.

  • Send the final and complete manuscript in Microsoft Word. Including all the front matter, the book block and any back matter. If your chapter has titles, include a table of contents, but don’t add the page numbers. This is one of the last things your designer will do after all of the text is set.
  • Organization and consistency is key. Manuscripts that are complex, especially non-fiction can become messy very quickly and, if not organized properly, can make it difficult for your designer to know how to proceed. So make sure that each element, such as chapter titles, section titles, each level of subheads and bullets, quotes, or other similar content is formatted the same throughout.
  • Make sure the information hierarchy is clear. For example, with part titles and numbers, chapters titles and numbers, sub-heads, and sub-sections it is important to make sure each of these elements is formatted the same way throughout the manuscript - and each are different from one another. The idea is to make it so the designer can easily spot the distinct parts and format them accurately.
    • For example: Format all part titles bold and 24 points, then make all chapter titles bold and 20 pt, so when the designer looks at your Word manuscript, they can easily see that those two items are not the same thing.
    • The same would be true for subheads. To indicate which is which, maybe format level one subhead as bold and 14 points, and then perhaps make level two subheads italic and 12 points.
  • If you’ve used unusual characters, foreign letters or words or other symbols, point these out to the designer.

Format the manuscript simply

  • Use only one font throughout the manuscript. Times New Roman is just fine. It can be used for everything - the chapter titles, subheads, everything. If a complimentary font is desired, this will be communicated before the project starts and the designer will apply it appropriately in their professional layout software.
  • Use of bold and italic is perfectly okay. The designer can easily see and retain that formatting.
  • Tables should be formatted simply with no extra spaces or tabs in the cells
  • If there is a pull quote or a boxed text feature, indicate this in your manuscript by typing [boxed text starts here] before the text that should be boxed, and [boxed text ends here] after that text.

Things to avoid:

  • Tabs or multiple spaces to indicate indents.
  • Double spaces after periods.
  • Hard returns. These are not "real" paragraphs and usually happen on accident when you press shift + enter to force text to drop to the next line. If these exist in your document its hard to tell if you meant to start a new paragraph or you simply wanted a specific word to be on the next line.
  • Make sure to hit the enter key once after a paragraph.
  • Multiple fonts. Please only use one font for your entire manuscript. Your designer and you will discuss fonts before your project begins.
  • Text boxes or Word art. These are available as formatting tools in Microsoft Word, but will not translate well upon import to professional layout software. If you need something special such as boxed text or other special formatting use the method described above to show your designer where it should be placed and speak with them to communicate your intention.
  • Microsoft Word is not a great layout tool. As much as you may want to, please don’t try to predesign the pages in book form. This is your designer's job and all your hard work will only have to be stripped out of the manuscript before it can be worked with in professional layout software.

Images:

  • Do not place images into your Word Document. Instead include the image name and its caption in your manuscript in the area where the image should appear.
    • For example: [imagename.jpeg, caption text]
  • Send the high resolution files (minimum 300dpi) in a zip file to your designer separately.
  • Name your images with the chapter number and something short that describes what is in the image.
  • Make sure you have permission to use any photo that you send. Do not send images that you find in a Google search. These will likely not be high enough resolution and you probably won’t have the necessary permissions to use them in your book.
  • If you need stock photos ask your designer for a trustworthy site to find the image you need. The price can range all the way from free to much more expensive, but generally you can find what you need for only a few dollars.
Pro-Tip: If your book has several images, provide a separate document to your book designer that has a list of every chapter and the images that should appear within each of those chapters. For each image, list the name and order of appearance.

Help for Independent Presses

Book Design & Production

Have you written a nonfiction or fiction manuscript? After it has been professionally edited, I can design the interior pages and cover, plus guide you through the maze of book publishing and printing. To get started, contact me to discuss your project and my helpful guide for authors.

Open post
Metadata for authors

Metadata – The Key to your Book’s Online Discoverability

Increase your book's discoverability with metadata!

Do you find yourself wondering how people will find your book after it is available for sale? A large and critical part of the answer is metadata. Understanding metadata and applying it properly is extremely important in the discoverability of your book.
What is metadata anyway?! It's kind of a mysterious and strange, "techy" sounding word that seems like it might be hard to apply. In short, metadata is data that provides information about other data. (Is that enough "datas" for you?) In the case of your book, it is all of the information that describes your book and includes these categories:
  • Title
  • Subtitle
  • Author Names
  • Description
  • Editorial Reviews
  • Author Bio
  • Keywords
  • Categories
  • Product details
  • Community Reviews
Google, Amazon and other sites have powerful technology that analyses all of this data so that it can show users of their services the most relevant content possible. All of the pieces of metadata that you assign to your book work together to help online sites know to show your reader your book. It then will help that reader determine if they want to read and ultimately purchase your book. So you can see why it is very important that each metadata category be fully and accurately filled out.


10 Tips for Selecting Keywords

  1. You're metadata will be used in many places, so keep a master document on your computer so you have it handy when you need it. This method also makes it easy to add to and keep your metadata current.
  2. In KDP you can choose up to 7 keywords and phrases, but have a list of 10-20 strategically chosen high quality keywords and phrases on hand.
  3. Keep them generic words that readers would use when searching.
  4. Don't repeat words in the title & subtitle - they are already taken into account by search engines.
  5. Include synonyms and spelling variations.
  6. Don't include misspellings. Amazon will offer alternate spelling of misspelled words to the searcher.
  7. Make your keywords specific to your book. They should not include other author names or titles.
  8. Do use search words and phrases that readers will use together to find your book and enter them in a logical order.
  9. If your book is about a specific location be sure to include that.
  10. It's also good to know that keywords work together with your chosen BISAC category and may increase your books' discoverability. So get as specific as possible with your BISAC categories because they are used by many companies throughout the supply chain to categorize books based on topical content. We'll explore more about BISAC Subject Codes in a later newsletter.

Pro Tip: If you run out of ideas for keywords, take a look at your reviews! Your readers may use some great words to describe your book.

  • If you don't have any reviews, check out a similar author and see how their readers describe their book.
While it does take some careful research to find great keywords, it is well worth your time and effort to find and compile relevant and specific keywords. You can then consider how these keywords may be used to form a high quality book description that further increases the chance that readers will be shown your book when they perform their searches.

For more information you can check out this helpful video from KDP University, and Ingram Spark's Free Online Self-Publishing Course.
 

Want more tips like this? Subscribe to my monthly book design newsletter.

Help for Independent Presses

Book Design & Production

Have you written a nonfiction or fiction manuscript? After it has been professionally edited, I can design the interior pages and cover, plus guide you through the maze of book publishing and printing. To get started, contact me to discuss your project and my helpful guide for authors.
Open post
Amazon Author Page

Do you have an Amazon Author Page?

Set up your Amazon author page to promote your book!

Did you know that you can have your own author page on Amazon? Yes you can - and it is pretty easy to set up. It only takes a few minutes and it's free!
Amazon Author Central enables authors to utilize the Amazon author page as a way to connect with readers. The Amazon author page is a valuable marketing tool that you can personalize. It's essentially a landing page on Amazon where readers can learn about you, see all the books you've published, see your recent blog posts if you have one, follow you and more.
Here's a list of the things that you can add to your page:
  • Books: After claiming your page you'll need to add your books to it by searching for the title or ISBN.
  • Bio: Use this section to enter a short bio. Make sure to include your website if you have one. Some people use this area to list upcoming events, new release dates, their social media links and contact email. Get creative!
  • Photos: You can upload multiple images. Include a professionally taken photo of yourself so people can see you and any other images that are relevant to you or your books.
  • Videos: If you have created a book trailer or have other videos that help you connect with your audience upload them here.
  • Blog: Do you have a blog with an RSS feed? Be sure to include it on your author page. Whenever you update your blog, the blog teasers that appear on the author page on Amazon update automatically, within 24 hours of being posted on your blog.
  • Customized URL: An author page URL is an easily shared link to your page on Amazon.com. It can be customized with whatever you wish it to be as long as it hasn't been taken by another user. In that case you'll need an alternative. Use your author page URL in your email signature, blog posts, Facebook posts and tweets.

Pro Tip: Write under a pen name? You can manage up to three pen names within a single Amazon Author Central account.

Amazon Author Central is an easy to use, valuable marketing tool for creating credibility, and driving sales of your books. To get started sign in with your amazon account here: https://authorcentral.amazon.com/


Want more tips like this? Subscribe to my monthly book design newsletter.

Help for Independent Presses

Book Design & Production

Have you written a nonfiction or fiction manuscript? After it has been professionally edited, I can design the interior pages and cover, plus guide you through the maze of book publishing and printing. To get started, contact me to discuss your project and my helpful guide for authors.
Open post

What goes on your front cover?

Tips for book cover design success.

Last month I talked about what content to include on your back cover, so, naturally, I thought I would expand on the important elements to include on your front cover. As with the back cover, it is critical to know who your audience is as you begin developing the copy and design of the front cover.
Because it is the first thing that potential readers will see, everything that is placed on the cover needs to be well thought out and intentional. The actual visual approach that you take with the design will vary depending on if your book is fiction or nonfiction, but in both cases the front cover should immediately speak to your audience when they see it.
Here are some things to include:
  • Title. The title will want to be the most prominent element on the page and set in a font that is fairly simple and easy to read. Keep in mind that if you are selling your book online the front cover will be thumbnail size when presented to online shoppers in browsers and reading devices. Therefore the legibility of the title needs to be crystal clear in both the larger printed version and the digital thumbnail size.
  • Subtitle (if applicable). This element is #2 in priority after the title. It also wants to be very legible and easy to read at small sizes. Often the subtitle is set in a smaller less "fancy" font than the title, but is still complimentary to the title. The design of the title and subtitle work together to create a typographic grouping that works with and enhances the rest of the design.
  • Series Number (if applicable). If your book is part of a series you can choose to include this information on the front cover. Usually it is quite small and worked into the typographic design of the title and subtitle or, in some cases, across the top of the page. Some authors choose to only put this on the spine or back cover, but if your book's fans will mostly be reading it as an ebook it can be helpful for them to see the series number on the front cover.
  • Endorsement. If you have an endorsement from a person with a well-known name, great for you! Endorsements can help add credibility to your book and it may work well to give a big name endorsement some prominence on the front cover, but limit it to one and keep it short. Start collecting endorsements and reviews early!
  • Author Name. Of course readers will want to know who the author is! This element is most commonly placed in the lower third of the front cover. Unless you are a super well-known and established author, the prevailing advice is to keep the author name small.
  • Design. Buyers do judge books by their covers! All of the previously mentioned elements need to work seamlessly with the overall design of the book. Hire a professional book cover designer to avoid a front cover design that is easily recognized as amateurish. The design of your book cover can be made up of images, or illustrations, it can be strictly typographic, or it can be a combination of all these things. Whichever direction you choose should reveal the tone of your book right away so that upon first glance the reader can instantly get a sense for the content inside. The design should also be reflective of other books in your genre - similar, but distinct, so that it "fits" with the other books on the shelf and also stands out. Finally - don't forget to look at a gray scale version of your cover - some e-readers don't display color, so the cover must still look good and be readable in gray scale.

Pro Tip: Don't try to do too many things on the cover design. Any image or illustration should only hint at the story inside the book. To create impact, try to limit the cover design to one striking image or symbol.


After the audience is defined and the research and planning is done then is it ready for the design phase. When I design the front cover of your book some of my goals include:

  • Readability of the title font
  • Seeking creative continuity from the front cover, over the spine and onto the back cover (and inside/outside flaps if it's a dust jacket).
  • Making sure the cover scales down to smaller sizes well.
  • Creating a cover that is unique but fits in the genre.
  • And finally...ensuring that you - the publisher! - absolutely love your book's cover design.

Want more tips like this? Subscribe to my monthly book design newsletter.

Help for Independent Presses

Book Design & Production

Have you written a nonfiction or fiction manuscript? After it has been professionally edited, I can design the interior pages and cover, plus guide you through the maze of book publishing and printing. To get started, contact me to discuss your project and my helpful guide for authors.

Open post

Back Cover Copy – What goes here?

Learn about which elements should go on your back cover to help sell more books.

Ever wonder what to put on the back cover of your book? This area should be used as a marketing tool that helps people see the benefits of buying your book. The copy that you put here should be aimed specifically at your audience, using language that they resonate and connect with. Ultimately, the back cover content is what sells the book. After the front cover or spine has snagged their attention, the copy that appears here will hopefully seal the deal and result in your reader making the purchase. And, because attention spans are short, this content needs to be easy to quickly read.
Here are some things to include:
  • A tagline. Appearing at the very top of the page, use an enticing one or two line sentence to provoke interest or intrigue. Keep it short to grab your reader's attention and pull them further down the page into more details about the book.
  • A book summary or blurb. This one or two paragraph block should be written with your reader in mind. However, it shouldn't be written in the same style as your book. Think of it more like ad copy, and to write effective ad copy it is critical to know who your reader is and then talk directly to them using language that they'll relate to. The book summary can help your reader understand why they want to buy your book and communicate to them how this book will benefit their life.
  • Reviews, endorsements, testimonials. Include 2-3 of your best reviews on the back cover. These short statements of praise from others helps add a feeling of credibility to your book. Seeing that other people, maybe some of them well-known, have read, endorsed and recommend your book, builds a sense of trust with your potential reader. Be sure to include your reviewer's name and credentials if they have them.

Pro Tip: Obtaining reviews, testimonials and endorsements can sometimes be a lengthy process. Don't wait until your cover is ready to be designed to ask people for these. Plan ahead and start early so they are available when your cover is ready to be designed.

  • Author biography and photo. Give people a way to start getting to know you as an author. Include a short bio about yourself and why you wrote the book. Keep it brief and clear, saving the longer list of achievements and story for your "About the Author" page in your book or on your website. Use a simple, professionally taken head shot for the photo.
  • Publishing Information. This section is for your ISBN bar code and could include the bookstore category, price (if you choose to include that), and your website address.


After you have all of the copy for the cover, only then is it ready for the design phase. When I design the back cover of your book some of my goals include:

  • Maintaining visual continuity that may come from the front cover and/or elements of the interior style. 
  • Keeping the information on the back cover easily digestible with the most important copy presented in a way that grabs the eye. 
  • Using various design techniques to eliminate any potential for an overcrowded, or cluttered feeling.

Want more tips like this? Subscribe to my monthly book design newsletter.

Help for Independent Presses

Book Design & Production

Have you written a nonfiction or fiction manuscript? After it has been professionally edited, I can design the interior pages and cover, plus guide you through the maze of book publishing and printing. To get started, contact me to discuss your project and my helpful guide for authors.
Open post

Finding Creativity in the Pause

Dear Friend and Reader,
I truly hope that this finds you and your family healthy and well. During this time of isolation and social distancing that is, understandably, very difficult for many, I have never been more grateful that I work from my home office. For some this time has provided a measure of relief from the daily grind, which can feel very rigid, and has opened up some space to pause, recharge, and put attention on (often creative) things that usually get pushed to the side.

There has been little to no down time for me as authors are utilizing this rare window of space to focus on writing and getting their books published, but I do recognize the importance of pressing pause on the stream of the routine of life.

For me this often lets the relentless chirping of thoughts, the rigid boundaries of schedule and emotionally challenging need to "keep it all together" settle and quiet down. It allows a little breath to move and within that I find what feels like authentic creativity. I've rarely been successfully creative when it's been pushed, forced or rushed. In my experience, creativity is a slow moving and evolving creature that only reveals itself when unencumbered by demand, distraction, and preoccupation.

So, if you are in Missoula and see me out walking the neighborhood on a sunny weekday afternoon, this is probably why. I just needed a pause.

Want more tips like this? Subscribe to my monthly book design newsletter.

Help for Independent Presses

Book Design & Production

Have you written a nonfiction or fiction manuscript? After it has been professionally edited, I can design the interior pages and cover, plus guide you through the maze of book publishing and printing. To get started, contact me to discuss your project and my helpful guide for authors.

Open post

Personalize your book

Make it special! Personalize it.

Did you know that Ingram Spark allows you to create and send personalized copies of your book. It's easy to do, inexpensive at only $1 per book, and is a great way to add a special touch when you want to.

Choosing this option adds one additional page with your personalized content and inserts it as the very first page of your book at the time it’s printed. It will only be added to that specific book and not books that are ordered through other retailers. You can add text and even an image! Simply click “Personalize It!” when placing your order.

Some ideas offered by Ingram Spark include:

  • One-Off Dedications, such as a special inscription for a friend or give-away winner.
  • Letters to Readers - think book club members.
    or
  • Commemorate an Occasion, such as an event where you will be speaking or your books will be available for sale.

There are many possibilities and ways to get creative!

Want more tips like this? Subscribe to my monthly book design newsletter.

Help for Independent Presses

Book Design & Production

Have you written a nonfiction or fiction manuscript? After it has been professionally edited, I can design the interior pages and cover, plus guide you through the maze of book publishing and printing. To get started, contact me to discuss your project and my helpful guide for authors.

Posts navigation

1 2
Scroll to top